On completion of this stage you should be familiar with the following concepts:
|
Modeling notions: |
<On Click> process |
|
Modeling techniques: |
Displaying one-to-many relationship, summing |
|
Useful process templates: |
Count, Sum |
|
Useful display templates: |
Refresh |
We shall continue with modeling the Issue Purchase Order View.
In the previous stage, we modeled the relationship between a purchase order and a requisition. Specifically the modeling is of a one-to-many relationship, where multiple purchase orders may be related to the same requisition, each containing some of the requested items.
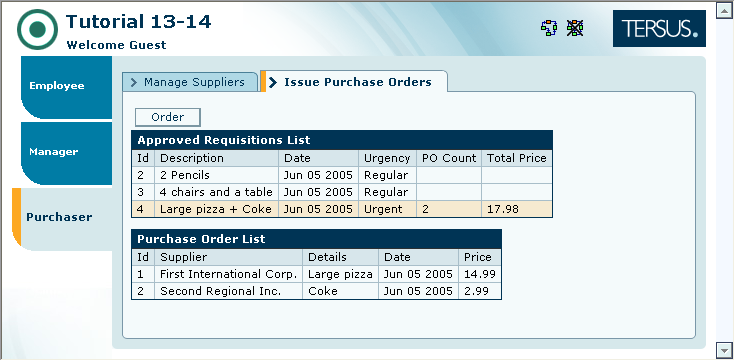
The sample project you have loaded includes the following additions to the Issue Purchase Order view:
A purchase order (PO) list appearing under the requisition list.
2 new columns added to the requisitions list: PO Count & Total Price
These additions to the view, do not display any data yet. We need to model the following:
Whenever a requisition is selected in the requisition list, the PO list is updated with the POs linked to the selected requisition.
Calculate PO Count and Total Price for each requisition, counting the number of POs linked to each requisition, and calculating their total price.
This stage’s modeling should be performed in the Tutorial 13-14 project, you imported at the end of the previous stage.
Our first task is to create a process that updates the purchase order list when a requisition is clicked in the requisition list.
Tersus supports this through a process with a reserved name – <On Click>:
Zoom to Approved Requisitions List/Row.
Add a Basic/Action. Name it <On Click>.
Alternatively, you can add the <On Click> process, by opening (through right-click) the Row element's context menu and selecting it from the Add Element sub-menu.
This is another example of a situation where a table display cannot be based on the Simple Table template – since the <On Click> process is part of the Row display element, while a Simple Table contains just a data structure.
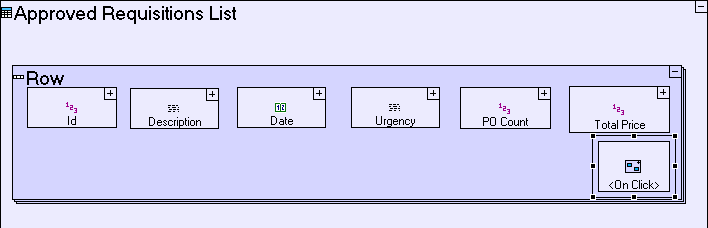
The Approved Requisitions List model should look similar to the following:
The <On Click> process should retrieve all purchase orders which are linked to the clicked requisition, so it first needs to get the Id of the requisition represented in this row. The requisition id for the the clicked row is available through an ancestor reference:
Zoom into <On Click>.
Add ancestor reference of Row.
Now we should create a sub-process which receives the requisition’s Id and populates the Purchase Order List with the matching purchase orders:
Add a Basic/Action. Name it Display Purchase Orders for Requisition.
Add a trigger to it, and create a flow linking Requisition Row/Id/<Value> to the trigger.
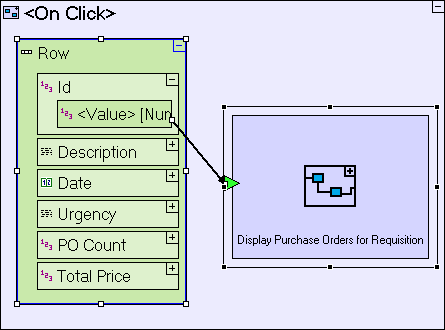
The <On Click> model should look similar to the following:
We will retrieve any purchase order whose Requisition Id field matches the Id of the current requisition:
Zoom into Display Purchase Orders for Requisition.
Add a Database/Find.
Add a trigger to it. Name it Requisition Id. Create a flow linking the trigger of Display Purchase Orders for Requisition to it.
The purchase orders retrieved should be converted into rows in the Purchase Order List table:
Add a Basic/Action. Name it Convert Purchase Order Record to Row. Mark it repetitive. Add to it a trigger and an exit. Create a flow linking Find/<Records> to the trigger.
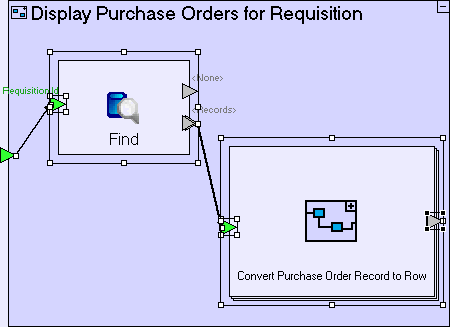
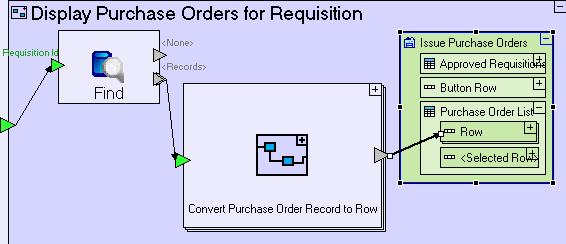
The Display Purchase Orders for Requisition model should look similar to the following:
Zoom into Convert Purchase Order Record to Row.
Drag a Purchase Order data structure from the repository/outline (it's available in Order button/Create Purchase Order popup/ Submit Order button). Add a flow linking the trigger of Convert Purchase Order Record to Row to the data structure.
Drag Purchase Order List/Row from the repository/outline (to create a display data element). Add a flow linking it to the exit of Convert Purchase Order Record to Row.
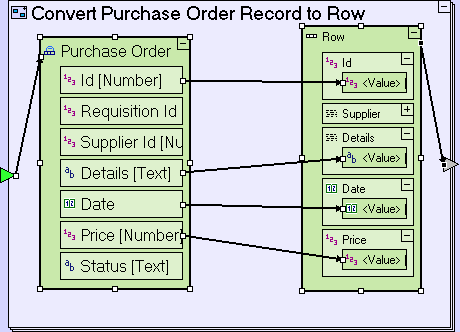
Create the following flows to map the fields of the purchase order database records to the fields of the rows in the display table:
|
Source |
Target |
|
Purchase Order/Id |
Row/Id/<Value> |
|
Purchase Order/Date |
Row/Date/<Value> |
|
Purchase Order/Details |
Row/Details/<Value> |
|
Purchase Order/Price |
Row/Price/<Value> |
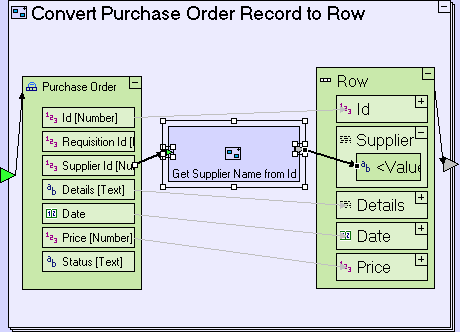
The Convert Purchase Order Record to Row model should look similar to the following:
There’s one additional field in the Row which we have not yet populated: The Supplier field. The Purchase Order data structure has a Supplier Id field which contains a numeric identifier of the supplier, which is not informative. Instead, we should display the supplier’s company name from the Supplier table in the database:
Zoom into Convert Purchase Order Record to Row.
Add a Basic/Action. Place it in between the Purchase Order database record and the Row display data element. Name it Get Supplier Name from Id. Add to it a trigger and an exit.
Create a flow linking Purchase Order/Supplier Id to the trigger of Get Supplier Name from Id.
Create a flow linking the exit of Get Supplier Name from Id to Row/Supplier/<Value>.
The Convert Purchase Order Record to Row model should look similar to the following:
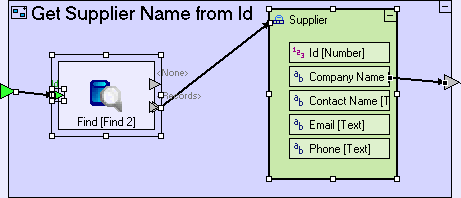
Zoom into Get Supplier Name from Id.
Add a Database/Find. Add to it a trigger and name it Id. Create a flow linking the trigger of Get Supplier Name from Id to Find/Id.
Drag a Supplier database record (it's available in Manage Suppliers view/Supplier List table, among other locations) into Get Supplier Name from Id. Create a flow linking Find/<Records> to Supplier.
Note that although the <Records> exit is a repetitive exit, it is linked to a non-repetitive target data structure. This is not a problem because we’re using Id as the retrieval criteria for the Find process, and since Id is unique, the process will never return more than one record.
Create a flow linking Supplier/Company Name to the exit of Get Supplier Name from Id.
The Get Supplier Name from Id model should look as follows:
You've
probably noticed that the
Find element we've just
added, appear slightly different than
usual, displaying
2 names: Find [Find 2].
Find, is the Element
Name. Find 2,
appearing in square brackets, is the Model Name. As
explained
previously (See Stage 2), elements have both a Model
Name and Element Name defined
automatically – but
since they are usually identical, they are usually displayed as one.
When adding an element to the
model, the Tersus Studio will automatically modify either of the
names in order to maintain uniqueness, by adding an index number, in
cases where the name provided by the user is already in use.
In the current scenario, the Find
element in Get Supplier Name from Id
is stored (by default) in the Approved
Requisitions List
package (check this by right-clicking Find
in the model editor and selecting Show in
Repository
Explorer). This package already
contained a model called Find
(the one we created in Display Purchase Orders
for
Requisition just beforehand),
and so the newer Find
must have a different Model Name.
To wrap up the modeling of Display Purchase Orders for Requisition, we need to send the created rows to the display:
Zoom out to Display Purchase Orders for Requisition.
Add an ancestor reference to the Issue Purchase Orders view.
Create a flow linking the Convert Purchase Order Record to Row exit to Issue Purchase Orders/Purchase Order List/Row.
The Display Purchase Orders for Requisition model should look similar to the following:
Note that we are now using a different method to populate a table with rows (compared to the various Populate… processes we modeled in previous stages): Instead of sending the rows to an intermediate Purchase Order List data element which is then sent to the display ancestor reference, the rows are sent directly to the display.
The model is simpler then previously modeled Populate… processes, but has one behavioral difference which needs to be addressed: Since the display is now updated at the row level and not at the table display level, the rows are accumulated by the repetitive row element, meaning that if rows were displayed in the table before the process was executed, the new rows created by the process will be added to the existing rows, instead of replacing them.
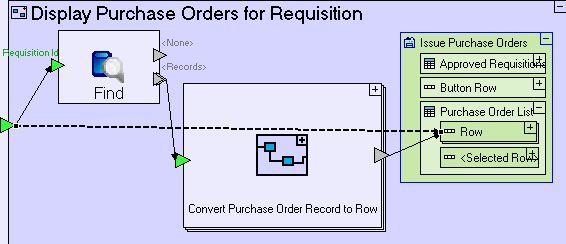
The solution is to make sure that the table is cleared, before the display is updated:
Create a Remove flow, linking the trigger of Display Purchase Orders for Requisition to Issue Purchase Order/Purchase Order List/Row.
The resulting model should look similar to the following:
You
might think that we could have
set the source of the remove flow from the Find/<None>
exit (as we did in the various Generate ... models
previous modeled), but that would actually be the wrong thing to do,
since it would only clear the table in those cases where Find
did not locate any purchase orders, and so will not clear the table
when records are found, causing duplicates to appear.
Setting
the remove source as we did, ensures that clearing the table occurs
regardless of Find's
result, and actually before Find is
executed.
Save your work, and view the application in the browser.
If you click on a requisition with issued purchase orders, they should appear in the lower table, in a similar fashion to the following:

Approved Requisitions List has 2 columns, PO Count and Total Price, which are currently empty. We shall now calculate these aggregate values for each requisition. These aggregates will be calculated on the fly for all requisitions in the requisition list:
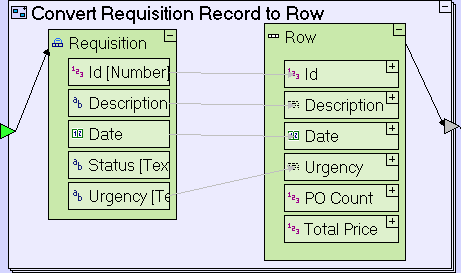
Zoom to Issue Purchase Orders/Populate Approved Requisitions List/Generate Approved Requisitions List/Convert Requisition Record to Row.
The Convert Requisition Record to Row model currently looks similar to the following:
We’ll add to it a sub-process which calculates the aggregates for a given requisition:
Add a Basic/Action template. Name it Calculate PO Aggregates for Requisition.
Add a trigger to the process. Name it Requisition Id. Create a flow linking Requisition/Id to it.
Add an exit to the process. Name it PO Count. Create a flow linking it to Requisition Row/PO Count/<Value>.
Add a second exit to the process. Name it Total Price. Create a flow linking it to Requisition Row/Total Price/<Value>.
The process should retrieve all purchase orders for the given requisition:
Zoom into Calculate PO Aggregates for Requisition.
Add a Database/Find template. Add a trigger, named Requisition Id. Create a flow linking the Calculate PO Aggregates for Requisition/Requisition Id trigger to it.
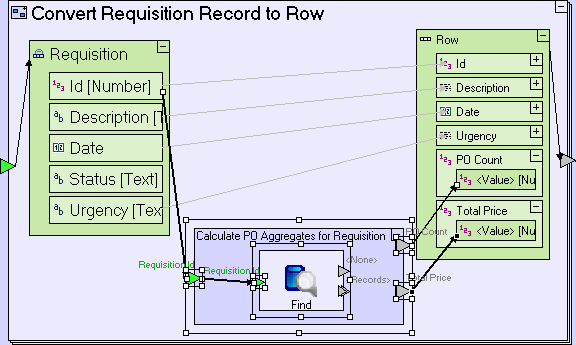
The Convert Requisition Record to Row model should now look similar to the following:
We are actually interested in 2 separate results based on the Find process:
Counting the number of returned Purchase Order records – this is the PO Count.
Summing the Price of each returned Purchase Order record – this is Total Price.
To count the number of records returned by Find, use the Count template, which counts the number of objects sent to its trigger (or triggers):
Add a Collections/Count
(![]() ).
Delete the unnamed non-repetitive trigger, leaving the repetitive
List trigger intact.
).
Delete the unnamed non-repetitive trigger, leaving the repetitive
List trigger intact.
Create a flow linking Find/<Records> to Count/List.
Create a flow linking Count/<Occurrences> to the Calculate PO Aggregates for Requisition/PO Count exit.
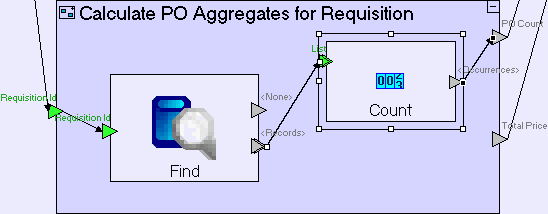
The Calculate PO Aggregates for Requisition model should now look similar to the following:
Count
does just that; it counts all objects sent to it, and when no more
objects are sent, it outputs the object count.
Note
that Collections/Count
has a
similar icon to Database/Sequence Number
- make sure you do not mix them up.
To calculate the total price of a requisition, we first need to extract the price for each purchase order:
Drag a Purchase Order data structure from the repository/outline. Set it repetitive. Create a flow linking Find/<Records> to it.
We shall use the Sum template to calculate the total price for the requisition.
Add a Math/Sum
(![]() ).
).
Create a flow linking Purchase Order/Price to Sum/Numbers.
Create a flow linking Sum/<Sum> to Calculate PO Aggregates for Requisition/Total Price.
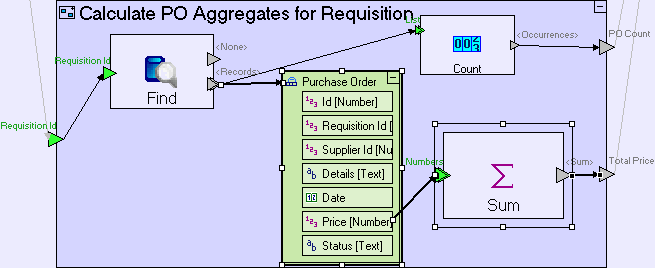
The Calculate PO Aggregates for Requisition model should look similar to the following:
Save your work, and view the application in the browser, which should display aggregates for requisitions with issued orders, similar to the following:
When the Issue Purchase Orders view is opened, and the Approved Requisitions List table is populated, the aggregates are shown correctly. However, when a new order is issued, the display (including the aggregates) is not updated.
In previous stages we've reused the Populate... process to update the table, and although we could do the same here, that will not be sufficient, since it does not clear the table (although that could be fixed). There's also the issue of the Purchase Order List table, which should be cleared since no requisition is selected.
An alternative strategy would be to force the view to completely refresh, as follows:
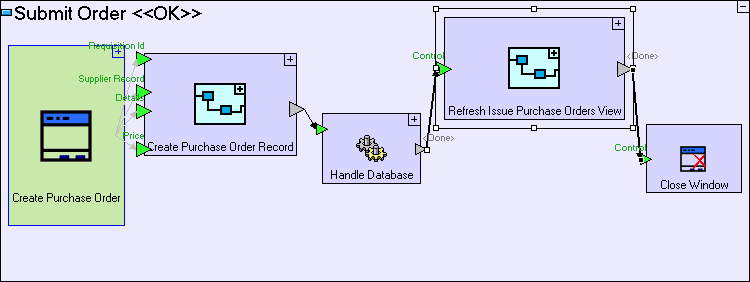
Zoom to Submit Order button.
Add a Basic/Action. Name it Refresh Issue Purchase Orders View. Add a Control trigger and a <Done> exit to it (using the Add Element context sub-menu).
Select the flow linking the Handle Database/<Done> exit to the Close Window/Control trigger, and drag the target to the Refresh Issue Purchase Orders View/Control trigger.
Create flow linking the Refresh Issue Purchase Orders View/<Done> exit to the Close Window/Control trigger.
The Submit Order button model should look similar to the following:
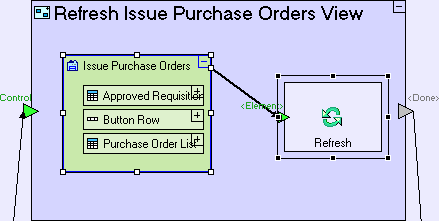
Zoom into Refresh Issue Purchase Orders View.
Add an ancestor reference to the Issue Purchase Orders view.
Add
a Display Actions/Refresh
(![]() ).
).
Create flow linking Issue Purchase Orders to Refresh/<Element>
The Refresh Issue Purchase Orders View model should look similar to the following:
The Refresh action reloads the display element passed to it, clearing the display element in question and executing any processes it contains – this is identical to the behavior when the element is loaded in the first place.
Save your work, and view the application in the browser.
Create a new order and note that the aggregates for the requisition in question are updated
Import the sample project Requisition Management System.
If you
installed the Tersus
Studio using the installer, there is no need to import the
project and it should be available in your workspace.
If you do need to import the
project, see the Importing a Sample Project section
at the end
of Stage 2.
This project contains all the functionality modeled thus far plus additional functionality required to complete the application.
Take a look at the added Manage Purchase Orders view model, which implements the following functionality:
A list of issued purchase orders
An Order Received button
The Order Received button does the following:
Updates the status of the selected purchase order to Received.
If the requisition to which the purchase order belongs has additional purchase orders not yet received, then it changes the status of the requisition to Partly Fulfilled. Otherwise, the status of the requisition is changed to Fulfilled.
Refreshes the display of purchase orders.
Click here to open the live project in a separate window.